Those of you who may have updated to Xamarin.Forms 2.3.4 may have noticed something peculiar with your IntelliSense and warnings in Visual Studio, Xamarin Studio and Visual Studio for Mac recently when working with your Xamairn Forms projects. Once of the things they have been discussing is changing how the OnPlatform mechanism works to provide better support for more platforms like Tizen or something other then the standard Android, iOS, & Windows. This update means that the way OnPlatform is coded for needs to be updated as well in our C# and XAML code.
Updating your OnPlatform in XAML
Before 2.3.4 our OnPlatform in XAML looked something like this
however this has changed and the above code samples now must be formatted a little differently, each platform must be nested inside the OnPlatform tag with an <On Platform> tag to define the values. Below is a example of the XAML updated to match the new style.
as you can see the biggest difference we are no longer using Device.OS but instead are switching to Device.RuntimePlatform and using Device.<platform> constant.
IF you want more info check out the Pull Request where this feature was added or this helpful Forum Post about the Redesign. If you are wondering about OnIdom, that has not changed.
Note: Mobile Center is currently in preview. This means that Mobile Center will change constantly. I will work to keep this as up to date as possible. This info is current as of 11/16/16.
Note: the Getting Started with Mobile Center post has been temporarily taken down for edits and reworking. I will remove this line when it is back up.
As announced by Nat Friedman during the Microsoft Connect (); 2016 Keynote, there is a new offering in town for mobile developers looking to have a complete Mobile DevOps solution. Its called Visual Studio Mobile Center. Mobile Center is a new offering currently in preview that combines the usability and features from HockeyApp such as Alpha, Beta, and Enterprise deployment, work flow integrations, and feedback and merge them with the power of the Xamarin Test Cloud and Xamarin Insights. Not only are they merging those features but it also allows those using Mobile Center to also use it for code sharing, and work tracking for agile workflows on top of bringing in support for not only Xamarin Developers, but those using React Native or Developing apps in Java, Obj C, or Swift. The bonus to all this is that it can work with your existing GitHub Repositories! That said, this might raise some concern for developers out there that use Visual Studio Team Services.
Currently the Mobile Center Preview only allows you to integrate your GitHub repositories to get the full experience that Mobile Center has to offer. While VSTS integration and Migration is planned down the road, this currently is not supported. This is partly because the Mobile Center team chose GitHub to start with, as this approach allow developers of all platforms to be able to get started and give feedback on the Mobile Center Preview. This by no means excludes those currently using VSTS, in fact there are a few options VSTS users can do, to still get a near complete or partial Mobile Center experience. Let’s look at the 2 most viable solutions out there right now: Using Mobile Center to manage your distribution, analytics, and crash reporting or Configuring your GIT client to allow for Multi Origin Fetches and Pushes.
Getting set up with Mobile Center
No matter what platform & method you are eager to try out Mobile Center with, there are a few steps you have to do first. I am assuming you have already done this steps. If you have not or are not sure how to do this, take a look at my post on Getting Started with Mobile Center.
Using Mobile Center to manage your distribution, analytics, and crash reporting
One of the awesome things about Mobile Center is its flexibility, even in Preview. If you have an existing app that you would like to use to try out Mobile Center from VSTS, you can configure a build task to deploy to Mobile Center. You can also have a Mobile Center and HockeyApp Deploy Step Side by side in the same VSTS Build Definition. Let’s take a look at how this can be set up.
1. Setting Up Mobile Center API Key
Like HockeyApp, you will need to generate a API Key so that VSTS has access to deploy the compiled binaries code to Mobile Center. To generate your API Key you must do this from the Mobile Center API. To get to the Mobile Center API you can go to https://docs.mobile.azure.com/api/ or can find it via navigation by clicking on the Docs & APIs link in the bottom left
Screen shot of Docs & APIs Icon + Link
this will bring you to https://docs.mobile.azure.com/. from here, you are going to want to click on the API Docs link in the Dashboard section on the left hand side. This will bring you to the https://docs.mobile.azure.com/api-docs/ page and then ask you to Explore the Mobile Center API Service with swagger.
Image showing Mobile Center Documentation of their API
This will bring you to a the Mobile Center API Service Page. Here you have access to all the API calls that are currently available within Mobile Center. I recommend getting your self familiar with the rest of the Mobile Center API Calls.
To be able to use any of the calls from the web browser, you must first log in to the API. To do this, Click on the Authorize button at the top of the page in the green header bar.
Image of Authorize button from the Mobile Center Swagger Service
This will pop up a window of available authorizations. You must enter your Mobile Center username and password in the Basic Authentication section. Once the info is entered, click authorize and it will log you into the API.
Image of Available Authorizations window on the Mobile Center Swagger API
once logged in, Your are going to want click on Account and click on the /v0.1/api_tokens POST option. I is important to note that GET commands are in BLUE, POST are in GREEN, PATCH are in ORANGE, and DELETE are in RED. From this view you can get info about what the call returns, parameters you can pass with the API POST, and implmented Response Messages. Currently there is only one type of API token that it creates and it is a user account based API Token. This is the token that we will use to give access to the VSTS build task.
Click on the Try it out button to generate your API Token. After a few seconds, the API will return with its results; a CURL command, a Request URL, and a Response Body, Response Code, and Response Headers. The returned JSON in the response body will contain an id, created_at, and api_token.
Image of Mobile Center Swagger Create Tokens API call
Now that the API key is generated, the VSTS build task can be configured.
2. Configure Xamarin code for Crash and Analytics support
If you have not already, you should configure your code for crash and analytics. If you are not sure how to do this, you can find out how in my Getting Started with Mobile Center post.
3. Set up & Configure Mobile Center Build Definition In VSTS
To configure your build task, log into your VSTS account and go into the build definitions, choose the Build Definition your want to add the Mobile Connect build task to and choose edit. Once editing your build task, you will need to add the Mobile Connect build task. Do this by clicking on the + Add Build Step… button. This will open the Task catalog.
From here, click on the all tab to list all build task options. Scroll down the list till you find a task called Zamboni Upload Utility and click the Add button to add it to your build task.
Note: Zamboni is the name that the Mobile Center build task is currently under. This will eventually be switched over the the Mobile Center branding. I will update this guide when it does.
Image of build task catalog within Visual Studio Team Services
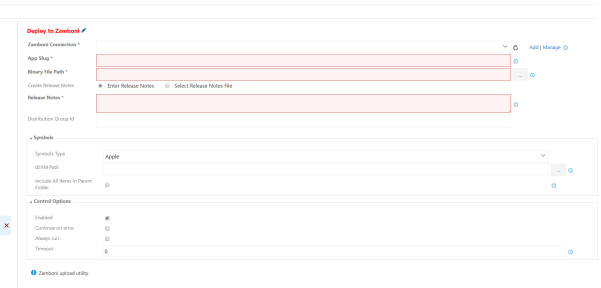
Once the Zamboni / Mobile Center build task is added to the list, it can be start to be configured. Its important to look at the variables
Zamboni Connection: This is the connection Endpoint which will authenticate you to publish your app to Mobile Center. (see steps below for configuring)
App Slug: This is where you enter the specific info that Identifies who you are and what app you want to push for. you will find this info in the URL of your app in Mobile Center
Binary File Path: This is the relative path from the repository root to the .apk or .ipa file you are publishing.
Create Release Notes: This has you choose to either manually Enter Release Notes or Upload a Release Notes File.
Distribution Group Id: Id of the Distribution group app deploys to
Image of Zamboni Build task in Visual Studio Team Services
To configure the task, you will need to start off by selecting a connection form the list of available connections. If this is your first time setting up a mobile center connection you are going to have to add an new service endpoint. To do this, Click on the add link text to the right of the Zamboni Connection box. It will ask for a Name for the connection and the API token. Enter a name for you to know what this is an endpoint of and enter the API Token you generated earlier in Step 1. After everything is entered, click on the blue OK button and select the newly added Endpoint from the drop down list.
Image of the Add new Zamboni Connection window
Once your connection endpoint is set up, enter your App Slug info. This consists of your Mobile Center Username and your App Name. This would look something like mitchmuenster-jozw/mobile-center-xat. Note: The name you use goes though a cleanning process so copying it directly off the UI may cause errors at build time and not be able to find your user or account. The best way to get the accurate info is by copying the info from your url bar from inside the app overview page. The url will look something like mitchmuenster-jozw/apps/mobile-center-xat. Remove just delete the apps/ part of the url and you will have your valid username/appname. It should look like mitchmuenster-jozw/mobile-center-xat
You then need to specify the build path for your complied .apk or .ipa file to deploy. The path should match what you have in the Path to Publish field of the Publish Artifact: drop task. This might look something like $(build.binariesdirectory)/$(BuildConfiguration). You also will have to specify the full app package name as well. The end result should look something like $(build.binariesdirectory)/$(BuildConfiguration)/com.lvluphealth.apk.
Then specify how you wish the release notes to be created by choosing to either manually enter them or enter the path to the file that contains the release notes.
Lastly, you will need to enter your Distribution Group Id. this allows you to specify which Mobile Center Distribution Group you want this app to be deployed to. The default Distribution Group is the Collaborators group. Currently the only way to find the group Ids is by going to the Mobile Center API Service Page choosing Accounts, and looking for the /v0.1/apps/{owner_name}/{app_name}/distribution_groups GET call. make sure you see a blue (i) to the right of the Response class. If you do not see that, make sure you are loged in AND have entered your API token ( the one you generated in step 1 ) into the API to authenticate your self and allow the calls on the site to work. Fill the owner_name and app_name parameter fields (required). these are the same that were used for the App Slug Step. Once the info is entered, click the “Try it out” button and your Collaboration Group Id’s will be in the response body. Copy the Id and paste it into the Distribution Group Id field. Note: The Default Group Id of Collaborators will always be 00000000-0000-0000-0000-000000000000 no matter what app you are deploying to in Mobile Center.
There is also the Symbols Type drop down list in the Symbols section, make sure to change this to the proper type of the app you are building out to. Since the app is already compiled into a .apk or .ipa, you don’t need to fill out the rest of this section.
From here, verify that the Zamboni Build task is after the Publish Artifact: drop build task and all your environment variables are configured properly. You are now set to Queue the build task. If the Task is sucessfull the app will now appear in Mobile Center. The members of the Distribution Group you deployed to earlier will receive an email notifying them the new app is ready to download.
Image sent to Mobile Center Team of new android build available for installation
While this does not give you the full Mobile Center experence and requires your to have your own or use the hosted build host, this will at least allow you to get started using the distribution, analytics, and crash reporting features of Mobile Center.
Using VSTS Git Repositories with Mobile Center: Configuring your Get client to allow for Multi Origin Fetches and Pushes
There is a second work around that will give you the ability to also use Mobile Center’s build process as well while still using your Visual Studio Team Services Repository. This will require you to go and set up a GitHub Account and a public or private repository for your app. While I realize at this point you may as well just commit your code to GitHub only, but this solution is for those who want to try Mobile Center while you wait for the VSTS integration to go live. This is also not the only way you can achieve this effect, I chose this way because it will allow you to start from the same code base as your current repository and try both Work around 1 and this workaround without altering your existing environment to heavily though you cannot use another analytics and crash reporting platform along aside Mobile Center as they tend to interfere with each other. This includes if you are using HockeyApp as well.
[Instructions coming soon]
Please Note: While I will try to respond to comments in this post as quickly as I can, the fastest way to get support is to use the messager built into Mobile Center or to post your questions on the mobilecenter channel of the Hockey Camp slack team (hockeycamp.slack.com).
Technology Hub Conference, is a First year conference that is coming to Appleton WI on October, 13th. Seeing that a tech conference was going to be happening in my hometown, naturally my interest was piqued. Being a former convention director myself, I tend to be overly critical towards conferences and the session or panels being put on. As my phone loaded their webpage I expected to find a conference that was just like all the others. What I found was something I was not expecting.
The first thing that surprised me is that not only was there a rather diverse session for a 1-day event, but it’s the first time since I started doing conventions that I have had a hard time choosing what panels to go to. Some panels conflict such as the keynote before lunch being done by Kara Swisher, a well-known writer and columnist on tech related things, or the CEO/CIO panel which panelists were selected for the innovations they have implemented within their organizations. They will be speaking on the successes and challenges they faced in being on the forefront of technology. Looking at the Session lineup, there is a wide variety of sessions from Azure, & Mobile all the way to sessions on creating positive and fulfilling work environments, and why some tech companies are choosing to farm-shore their tech work rather then move it off-shore to other countries.
Looking at the speaker list you can see it is just a colorful as the list of sessions. There are some bigger speakers such as Steve Gearhart (Plexus CIO), Mitch Weckop (Skyline Technologies CEO), and mixed in with them are Community leaders such as Greg Levenhagen, David Giard, Lisa Anderson and even some teachers from FVTC. Even with such a broad & diverse speaker list, I started to notice a pattern.
I knew a lot of these people… but I couldn’t put my finger on the reason why I knew some of them. I know I have met some of these speakers at other conferences, but not all of them. And then it hit me, A lot of these are also members of AITP(Association of Information Technology) a chapter who also had a student chapter within Fox Valley Technical College, where I occasionally speak at and graduated from. Looking at the partners of Technology Hub, I learned that not only is AITP involved, but that WIT (Women in Technology Wisconsin) was involved as well.
Regardless of if you’re looking for work in the IT sector, or looking to pick up a new skill, I recommend checking out Technology Hub Conference October 13th. If you are planning to attend, feel free to say hello to me, I will be helping out in the TechHappy: Hacking Positive Communities and Rapid Application Development with Xamarin sessions. See you there!
A Custom Home lighting experience with a Particle Photon and a Xamarin Mobile Cross platform app.
Background
We have all seen examples where we send data to cloud services like Azure or AWS. However, this is taking info from a photon or electron, and sending it to the cloud. In the latest project I was part of (the “force user”), I used a Microsoft Band to get my heart rate and send it to a windows phone where it reports that information and then sends data to a photon to make the LED’s Flash the same BPM as my heartrate. And this got me thinking, how exactly do I send data to the photon? In that example, that was already figured out by Barry Nusz, who made the original project that it was based off of. When I did the research myself, I found there was not explaining this besides a curl call, which I am not used to using as a .net developer. In my quest to learn this, (and my own laziness) I created this hack, which allows you to control the color and lighting in your own home all from your phone.
Purpose
With the plethora of Wi-Fi enabled color changing light bulbs on the market, what would be the benefit to making my own device when buying one would be easier? Why directly call the particle, when we have wonderful services like AWS and azure which we can hook into?
Besides having the fun of inventing your own product, making your own gives you not only a less expensive option, but lets you do things outside the scope of a purchased product’s API. Take, for example, one of the more popular products currently on the market, the Philips HUE bulb. For $79.95. you get a starter kit which comes with the wireless bridge, and 2 light bulbs for just the white lightbulbs. Or if you are looking to add some color to your home, you would want to go with the $199.99 US White and Color Ambiance Starter Kit. These kits are great and give you a lot of out-of-the-box features to get things working quickly, and it is an all around a great product for the price point. But it falls short when you want to go outside the realm of their out-of-the-box features and add your own. For that, you would have to write some code anyway. However, for the same or less cost, I can easily purchase a led strip that lets me accomplish the same functionality as the Philips Hue, without being limited by what is pre-programmed. Every Feature they list can easily be done yourself with just a bit more effort than unwrapping a box.
OK, so why would you want to call the photon directly when there are lots of cloud services you can call to accomplish do the same thing? Simple! Not everything needs the cloud to work. Now don’t get me wrong, the cloud is all the rage and helpful in many ways, but it doesn’t need to be used as the way to talk to all devices. The cloud becomes useful if you are sending data you need to aggregate, analyze or store or if you need a web service to tap into later. If you just need to send a device a command, talking directly is probably the better option. If you are looking to use Alexa, Amazons bit into the voice market, that is the one exception, but that is for a different hack.
5v Power Supply (preferably 2 Amps or more if you want more than 1 LED strip)
Software
Visual Studio 2015 Community Edition or higher OR Xamarin Studio
Xamarin Indie License or higher
Building the Project
1. Obtaining the hardware for the scale of the project
For this project I opted to use the 144 LED per meter LED strip for its overall brightness since I am lighting a 14’ x 20’ room and wanted complete coverage of the room. You might choose the 60 LED per meter strip to achieve the same effect, but I wanted to get the maximum LED per meter available. Looking back, had I known I was going to be interested in more moving patterns, I would have gone with the DotStars over the NeoPixles as they make “prescience of vision” effects better and have a faster refresh rate than the NeoPixles. Be sure to pick up the proper power supply for the project. While with this demo I am running the one strip just off the photon (5V 1A) It is recommended that you use a separate power source to power the strips. With the way that the NeoPixel led strips are created you will need certain hardware to be able to attach to the cable. Specificly you will need a JST SM 2pin Plug to be able to connect your device to the strip to control the strips, and if you use any power supply from Adrifruit for this project you will need the DC Power Jack’s that I use since their power adapters have a plug that is 2.1mm.
2. Wiring up the Photon & LED strip
Now that we have all the hardware we need for this project we can start connecting everything together. With the amount of power, we will have going through the cables, It is recommended that you make a more secure method of connecting the wires then a breadboard. If you don’t plan to reuse the components or are getting it ready for a long term install, I’d recommend soldering the wires together. If you want to reuse the photon at some point, you can buy male to female wires, strip the male end and solder that to the led strip, and plug the female end into the corresponding photon ports. Since I am reusing these components later, I use a bread board to connect the photon and the control wires together.
Start by taking your Female JST SM 2pin Plug and connecting it to the Male JST SM 2pin Plug on the NeoPixel strip. This is the side you want to connect to and is the start of the flow of the strip.
Once that is set up attach a Male & Female DC Power Jack to the end of the JST SM 2pin Plug wires with no connecter attached. If you are going the Soldering route, you can skip this step.
Next you are going to want to take 2 wires and connect the Positive and negative ends of the Male DC Power jack (if you are going the reusable route) and connect the positive wire to the D2 port of the photon and the Negative wire to the GND port. If you are going the soldering route. You can solder the white wire from the LED strip to the D2 port of the particle and the Black wire from the LED strip to the GND of the photon. NOTE: the code sample I have uses the D2 port, but you can use any of the 0-7 D ports on the photon.
To finish the installation, take a Female DC Power Jack and connect the Red (5v / positive) & Black (Ground) lines to that Female DC power jack. Once that is complete, you can hook up the power brick to the Power Jack you just attached.
Your finished hardware setup should look something like the diagram below. Now that your hardware is hooked up, we can move on to coding up the photon.
3. Setting up the code for the Photon
When we write code for the photon we will be doing it in the Particle IDE which can be found by going to https://build.particle.io. If you have not already set up your particle device, you will need to create an account and register your photon to your account. To help you get started particle has a nice document on this that can be found here. If you already have a particle account and your device is claimed, you can continue reading.
Photons can be coded like most Arduino devices, however to use the NeoPixle strip I had to include the NeoPixel library so that we can assign the LED’s the color we want or create fun patterns which they show in the demo library. This demo however just uses solid colors.
Once that is done, you can just copy and paste the code from the gist https://gist.github.com/MobileRez/5d2f21028735221f8592 into your particle code and complete the setup. Then deploy the code onto your photon before continuing.
4.Programming the Mobile App with Xamarin Forms
To be able to call your photon and change your lighting color, I built a cross platform app you can side load yourself, however there is a little work we have to do to get things configured to get the app to work fully. For your convenience I have also added projects for Droid, iOS, Windows Universal, Windows Phone 8.1, and Windows 8.1
4.) On lines 21 and 22 of LedControlViewModel.cs in the ViewModel folder you will need to add your Device Id and your Access Token.
5.) You can get your Photon Device Id by going to https://build.particle.io/ => Devices => Select <YourDevice> => Click to expand => Copy <DeviceId>
6.) You can get your Access Token for the particle cloud by going to https://build.particle.io/ => Settings => Copy <Access Token>
7.) You can now deploy the app to your phone and should be able to change the color of your NeoPixel led strip.
How it all Works
To get the photon to be able to be sent a command from an outside source like a phone app or a website, we use what is called a Particle Function in our particle code to make that available to the API. we define it like so in the setup of our code:
Particle.function("ledcolor", ledColor);
On the Xamarin side we have to make a http post call to the API to let it know what we want to change the led strip color to. We do that on the .NETside by using System.Net.Http.HttpClient which can be found in the LedControlViewModel.cs file.
LED Strip In Action
This slideshow requires JavaScript.
Mobile App running on the mobile platforms
This slideshow requires JavaScript.
Conclusion
I started this project looking for a way to leverage my knowledge of Xamarin as well as give myself a good foundation base with the particle functions to use that in future projects, and this project has done just that. My choice to use a led strip for this project over doing something else was done to keep the core concept simple and focus on how a particle function works and how to call a particle function from a Xamarin app.
While helping out at the Microsoft booth at Code Mash this
past week, I had an unintentional realization, that I can combine some of my
projects I have been doing or helping with, and bring Biofeedback into the mix
and change the nature of what the intention of the project is entirely as shown
by the video below.
The project featured in that video was created by Paul DeCarlo,
a Microsoft Tech Evangelist and the person talking in the video. It was
originally his entry into the competition put out by Particle https://www.hackster.io/challenges/particle-star-wars
and what it ended up being was a way for me to watch and control my heart rate during
the conference and as such, I was able to have a normal heart rate during my presentation
later that conference (a nice 76 during my talk).
So just what is this biofeedback and how did it help me
translate lights that were reporting my heart rate into allowing me to increase
or decrease my heart rate? To answer that we must first get a better understand
of what is going on. Biofeedback is the use of electronic monitoring of a
normally automatic bodily function in order to train someone to acquire
voluntary control of that function. There are different types of biofeedback
that can be accessed depending on what needs to be accomplished. You can read
brainwaves, breathing, heart rate, muscle, temperature, and sweat glands. All relate
to different responses our body has as well as what we want to change within our
self’s to improve. Using brainwaves has the widest range of applications since
that can relate to things more than just stress or anxiety, but things from
helping improve your performance with sports or help you lose that weight your
body seems to hang onto for no reason. Luckily for this demo, heart rate was
involved and that can be tapped into differently than brainwaves can thanks to
health devices like the Microsoft Band 2. In all these cases training is done
with the help of some visual feedback to guide your body to produce certain
results.
Given all this, you can put it together with IoT
to create visualizations or other methods of response to biofeedback to help us
better ourselves and make us more aware of our own bodies and better understand
our self’s (and get a cool light show in the process).
“Are you done using the Mac yet?” This was a common sentence
I heard uttered though out the offices of the clients I would work at doing
various mobile projects with Xamarin in companies where they only sprung for 1
mac for the mobile team to use to build iOS apps. It was that, or the colorful
choice words from a developer’s mouth when visual studio would crash and the Xamarin
Build host still thought another machine was connected. In fact, unless you
have worked on a Mac Laptop with a Windows VM, you probably have fought with
the build host at some point in time. Thankfully, the Dev Team at Xamarin, has
worked hard to no longer make this a problem in their latest roll out of Xamarin
dubbed Xamarin 4. Their solution to this once plaguing Issue? Xamarin Mac Agent.
Above: The Toolbox and Banana Finder solutions are connected to the mac at the same time!
Unlike the old build host which ran as a secondary program
on the mac, slow and rather clunky to use and allowing only 1 computer to be
connected at a time, The Xamarin Mac Agent has changed all this by being
rewritten from the ground up giving developers a faster setup and connection
time, while allowing multiple connections to this box at one time. They achieve
this by connecting to the mac over SSH and starting new MSBuildProcess on the
windows side, each managing their own SSH connection to the build host which
them manages the iOS designer, and the Build agent. They also have made the UI
interface of connecting to Visual studio much easier to use and work with, and
a clearly visible connection icon is present when connected to the Xamarin Mac
Agent.
Above: a photo of just how clean and clear the new Xamarin Mac Agent is to the developer.
As you may or may not know, Xamarin has released version 1.0
of Xamarin Test Cloud. With that on top of the 60 min a month base Xamarin
gives you to test how your app looks on more than 1,700 devices spanning
android and iOS tablets and phones. This intrigued me, so I decided I wanted to
learn more about how to integrate TC into my projects.
As luck would have it, I have just the demo app I want to
try it out on: my networking & connectivity talk for Xamarin Dev Days
Madison. (For more info see https://ti.to/xamarin/dev-days-madison)
Unfortunately this project is incomplete, but that’s okay because you can keep
updating your code to match, which is awesome as it is not reliant on you to
keep regenerating new projects or code to keep it up to date. While there are
many ways to get your apps into test cloud and your tests started, I started
out by adding a UITest Project to my app in Xamarin Studio.
You can add it
yourself:
In iOS Ctrl + Click on the solution of the app
you wish to add the UITest to > Add > Add New Project
From here a window pops up asking you to choose
a new project. Click on “Tests” in the Cross-Platform Section.
If it is not already Click on UITest Project in
Xamarin Test Cloud.
Click Next to continue
Name your project and click continue. I like to
follow the format of appname.platform. so in this case, it would be
LoginWithMasterDetail.UITest
Now that we have our UITest Project created, we can start getting it set up. There are 2 main files in a new UITest Project Solution, Tests.cs and AppInitializer.cs. The AppInitializer Helps the UITest & Test Cloud find the apk and the ipa for your app for its respective platforms to be run. You can configure it by entering in .AppBundle (“../../../iOS/bin/iPhoneSumulator/debug/XamarinForms.iOS.app”) ” as an example for iOS. You may have to edit the path to match your environment and avoid and issues along the way and allowing your project to be seen and built. The Test.cs is where the UITests will be stored and run.
You can test for many things in your code from simply “How does it look” to walking through every strep a user would take while using the app. While I recommend looking at the API for the full list of functionality that you can do with UITesting, You can use it to check more complex things like Scrolling Strategy, Change the GPS of the device to simulate physical movement happening, and even the ability to query certain view elements to make a match.
Once your test is built and to your liking, you are ready to move on to getting it deployed to test cloud. For this blog post, I chose to use Xamarin Studio on iOS and deploy to Xamarin test cloud with an iOS app to test with. However if you are more comfortable in the command line, you can deploy it to test cloud from there. You can also deploy to Test Cloud via Calabash which runs in ruby. They both have their own ways to write tests and push code, so use what you are most comfortable with.
To deploy to Test Cloud from Xamarin Studio, you must first must go into the Unit Tests tab on the right hand side of Xamarin Studio. If you do not see it there, you can get to it from the top navigation menu of OSX and go to View -> Sketch (also found by View->Pads->Unit Tests). Once you are there, Ctrl + Click on Test Apps (You can find it by looking for a blue circle with the play symbol inside of it) and choose “Add App Project”. You should see a window pop up that has a list of your projects on it. This shows a list of all compatible project types. Select the projects you wish to deploy to test cloud. (In this case it would be only iOS as that is what I am doing in the demo, however checking both or just android will not affect your results. Once you have selected the projects you wish to run, click okay and you will see that the projects are now listed with info about what target, os, device type it is set to.
Once your project is added to the test list, you can Ctrl + Click on your UI test project (if you are following my naming convention form earlier you would be looking for the one that is .UITest) and chose deploy to test cloud. If you have not already done so, you may want to go to the test cloud site and get your app set up.
NOTE: This is where I got stuck and had to do some research. When I would try to build, it kept failing saying that it could not find my .ipa file. Make sure you Xamarin Studio is set to Debug (nothing after it) and navigate to your [iOS Proj]/Bin/Debug/ folder and look to see if it was there. If not you have to do a build to get it to work. With me, I had done a build but it named the project LoginWithMasterDetailiOS.10.ipa making XS not able to find it. Once you have successfully built the ios app. rename the .ipa file to not have that 10 in the name and you should successfully build.
And that’s it. The rest is rather strait forward, following the steps, choosing what devices and waiting for it to run. Happy Testing!
For those of you who have not yet heard, all Xamarin Subscriptions
Include Xamarin Test Cloud Device Minutes. This is awesome as any android developer
will know, it’s hard to know what your app will look like when your device
looks proper on all the Android devices in existence (currently there are over
7,000) combine that with all the windows, and ios devices, it’s hard to know how your app will turn out
looking UI wise.
Now you might be saying “But Mitch, I use <insert one of
the many UI testing services here>, I don’t want to use Xamarin test cloud.”
And you are in your own right to use whatever
service you want, but here are some reasons you would want to.
1.
You already have time paid for
2.
Xamarin Test Cloud is an awesome product that
the Xamarin team has been hard at work to develop.
3.
If you use Calabash or Xamarin UI Test, You are
not getting the full range of devices unless you own them that you could be
with Xamarin Test Cloud.
4.
A lot of the services out there are mostly for
Phone Gap app UI Testing.
5.
You can test Xamarin, iOS, & Android apps
I could blab on more about test cloud, but why not try it out
for yourself! https://xamarin.com/test-cloud
Sorry for the lack of updates, Busy with a few projects I am trying to hash out and getting my talk edits ready for That Conference (I need to stop waiting till the week before my talks to edit them)
So things im working on getting out.
~ Mitch’s door app ~ UI Samples for GitHub ~ Native Android NFC Bite Read/Write UI Code (they said it couldn’t be done… well the individual byte read/write part) ~ New talk: These Aren’t the UI You’re Looking For ~ Xamarin Dev Days: Madison
Other thoughts:
I finished my 80th Xamarin Uni class this evening and it made me think about some things… I have 2 instructors a lot and I have some habits that I am taking away from them or things I noticed.
1. You are surprised when you take a Xamarin U class with Glenn Stephens or Kym Phillpotts and there are less then 3 flash quizzes in the class.
2. You find your self speaking in a Australian accent when talking about Xamarin or saying your name.
3. Your phone tells you the weather in Celsius while living in the US, in case you end up talking about it.
4. You prefer taking classes that are during the work day in Australia.
5. You get more recruiting job offers from Australia then the US (and can’t afford the move)
6. You have more Go To Training emails reminding you class is about to start then actual class emails.
7. You know how to move the Go To Training Timer box.
8. You have become a better C# programmer because of F# classes.
Life with Asperger’s is not always the easy life, in today’s world there are many roadblocks set against a person, and even more so for those with autism. But Today that has been lessened a little bit as I have passed my Xamarin Certification Exam After starting from scratch this past month in the world of C#, Mobile development, and Xamarin. This has made me stop and reflect on this past month.
When you go thought and think about life, we are going though things in a rush, completing tasks, going to meetings, and other activities that at their core are constantly changing the state of a Boolean. We can get so focused on our self’s that we forget to keep things in prospective. We set goals, dream big and start small. As I have spent the past month furiously learning everything I can from Xamarin University to prepare myself for the certification test and expand my understanding about the Xamarin universe that I lost sight of what was actually unfolding around me.
“The river tells no lies, though standing on the shore the dishonest man stills hears them”
Only until now when I am about to take my certification test, studied my notes, filled out and rechecked the study guide I made for myself did I start to realize what was being passed to me. They were not just words spoken because the job requires it. This information was being passed to me as a Master craftsman passes on the knowledge to an apprentice.
“The future is predetermined by the character of those who shape it”
This past month has been a month of learning, a month of sleepless nights, a month of loss and gain, and a month that has truly shaped me to be a better person and Xamarin developer, in ways I cannot yet begin to understand, I know that my life has been changed by the amazing team working at Xamarin University and I know that I have been changed for good.