![]()
Note: Mobile Center is currently in preview. This means that Mobile Center will change constantly. I will work to keep this as up to date as possible. This info is current as of 11/16/16.
Note: the Getting Started with Mobile Center post has been temporarily taken down for edits and reworking. I will remove this line when it is back up.
If you are brand new to Mobile Center, Please start with my: Getting Started with Mobile Center post.
As announced by Nat Friedman during the Microsoft Connect (); 2016 Keynote, there is a new offering in town for mobile developers looking to have a complete Mobile DevOps solution. Its called Visual Studio Mobile Center. Mobile Center is a new offering currently in preview that combines the usability and features from HockeyApp such as Alpha, Beta, and Enterprise deployment, work flow integrations, and feedback and merge them with the power of the Xamarin Test Cloud and Xamarin Insights. Not only are they merging those features but it also allows those using Mobile Center to also use it for code sharing, and work tracking for agile workflows on top of bringing in support for not only Xamarin Developers, but those using React Native or Developing apps in Java, Obj C, or Swift. The bonus to all this is that it can work with your existing GitHub Repositories! That said, this might raise some concern for developers out there that use Visual Studio Team Services.
Currently the Mobile Center Preview only allows you to integrate your GitHub repositories to get the full experience that Mobile Center has to offer. While VSTS integration and Migration is planned down the road, this currently is not supported. This is partly because the Mobile Center team chose GitHub to start with, as this approach allow developers of all platforms to be able to get started and give feedback on the Mobile Center Preview. This by no means excludes those currently using VSTS, in fact there are a few options VSTS users can do, to still get a near complete or partial Mobile Center experience. Let’s look at the 2 most viable solutions out there right now: Using Mobile Center to manage your distribution, analytics, and crash reporting or Configuring your GIT client to allow for Multi Origin Fetches and Pushes.
Getting set up with Mobile Center
No matter what platform & method you are eager to try out Mobile Center with, there are a few steps you have to do first. I am assuming you have already done this steps. If you have not or are not sure how to do this, take a look at my post on Getting Started with Mobile Center.
Using Mobile Center to manage your distribution, analytics, and crash reporting
One of the awesome things about Mobile Center is its flexibility, even in Preview. If you have an existing app that you would like to use to try out Mobile Center from VSTS, you can configure a build task to deploy to Mobile Center. You can also have a Mobile Center and HockeyApp Deploy Step Side by side in the same VSTS Build Definition. Let’s take a look at how this can be set up.
1. Setting Up Mobile Center API Key
Like HockeyApp, you will need to generate a API Key so that VSTS has access to deploy the compiled binaries code to Mobile Center. To generate your API Key you must do this from the Mobile Center API. To get to the Mobile Center API you can go to https://docs.mobile.azure.com/api/ or can find it via navigation by clicking on the Docs & APIs link in the bottom left

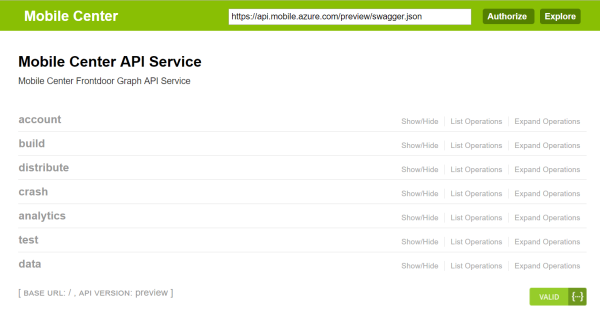
this will bring you to https://docs.mobile.azure.com/. from here, you are going to want to click on the API Docs link in the Dashboard section on the left hand side. This will bring you to the https://docs.mobile.azure.com/api-docs/ page and then ask you to Explore the Mobile Center API Service with swagger.

This will bring you to a the Mobile Center API Service Page. Here you have access to all the API calls that are currently available within Mobile Center. I recommend getting your self familiar with the rest of the Mobile Center API Calls.
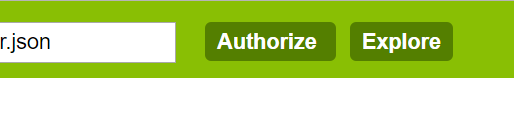
To be able to use any of the calls from the web browser, you must first log in to the API. To do this, Click on the Authorize button at the top of the page in the green header bar.
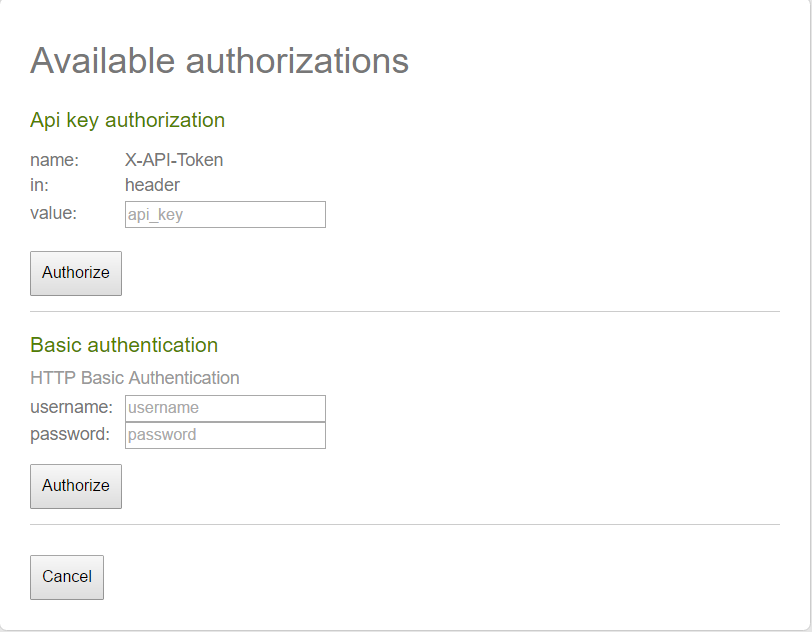
This will pop up a window of available authorizations. You must enter your Mobile Center username and password in the Basic Authentication section. Once the info is entered, click authorize and it will log you into the API.
once logged in, Your are going to want click on Account and click on the /v0.1/api_tokens POST option. I is important to note that GET commands are in BLUE, POST are in GREEN, PATCH are in ORANGE, and DELETE are in RED. From this view you can get info about what the call returns, parameters you can pass with the API POST, and implmented Response Messages. Currently there is only one type of API token that it creates and it is a user account based API Token. This is the token that we will use to give access to the VSTS build task.
Click on the Try it out button to generate your API Token. After a few seconds, the API will return with its results; a CURL command, a Request URL, and a Response Body, Response Code, and Response Headers. The returned JSON in the response body will contain an id, created_at, and api_token.

Now that the API key is generated, the VSTS build task can be configured.
2. Configure Xamarin code for Crash and Analytics support
If you have not already, you should configure your code for crash and analytics. If you are not sure how to do this, you can find out how in my Getting Started with Mobile Center post.
3. Set up & Configure Mobile Center Build Definition In VSTS
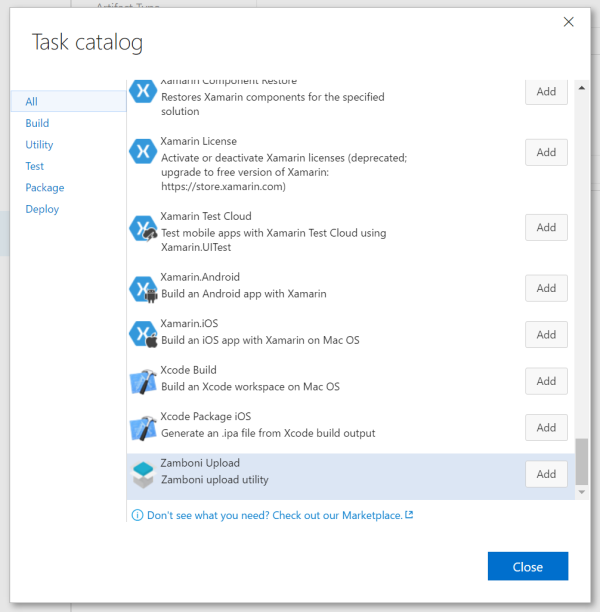
To configure your build task, log into your VSTS account and go into the build definitions, choose the Build Definition your want to add the Mobile Connect build task to and choose edit. Once editing your build task, you will need to add the Mobile Connect build task. Do this by clicking on the + Add Build Step… button. This will open the Task catalog.
From here, click on the all tab to list all build task options. Scroll down the list till you find a task called Zamboni Upload Utility and click the Add button to add it to your build task.
Note: Zamboni is the name that the Mobile Center build task is currently under. This will eventually be switched over the the Mobile Center branding. I will update this guide when it does.
Once the Zamboni / Mobile Center build task is added to the list, it can be start to be configured. Its important to look at the variables
Zamboni Connection: This is the connection Endpoint which will authenticate you to publish your app to Mobile Center. (see steps below for configuring)
App Slug: This is where you enter the specific info that Identifies who you are and what app you want to push for. you will find this info in the URL of your app in Mobile Center
Binary File Path: This is the relative path from the repository root to the .apk or .ipa file you are publishing.
Create Release Notes: This has you choose to either manually Enter Release Notes or Upload a Release Notes File.
Distribution Group Id: Id of the Distribution group app deploys to

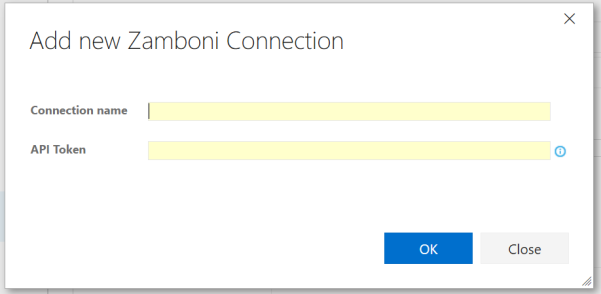
To configure the task, you will need to start off by selecting a connection form the list of available connections. If this is your first time setting up a mobile center connection you are going to have to add an new service endpoint. To do this, Click on the add link text to the right of the Zamboni Connection box. It will ask for a Name for the connection and the API token. Enter a name for you to know what this is an endpoint of and enter the API Token you generated earlier in Step 1. After everything is entered, click on the blue OK button and select the newly added Endpoint from the drop down list.
Once your connection endpoint is set up, enter your App Slug info. This consists of your Mobile Center Username and your App Name. This would look something like mitchmuenster-jozw/mobile-center-xat. Note: The name you use goes though a cleanning process so copying it directly off the UI may cause errors at build time and not be able to find your user or account. The best way to get the accurate info is by copying the info from your url bar from inside the app overview page. The url will look something like mitchmuenster-jozw/apps/mobile-center-xat. Remove just delete the apps/ part of the url and you will have your valid username/appname. It should look like mitchmuenster-jozw/mobile-center-xat
You then need to specify the build path for your complied .apk or .ipa file to deploy. The path should match what you have in the Path to Publish field of the Publish Artifact: drop task. This might look something like $(build.binariesdirectory)/$(BuildConfiguration). You also will have to specify the full app package name as well. The end result should look something like $(build.binariesdirectory)/$(BuildConfiguration)/com.lvluphealth.apk.
Then specify how you wish the release notes to be created by choosing to either manually enter them or enter the path to the file that contains the release notes.
Lastly, you will need to enter your Distribution Group Id. this allows you to specify which Mobile Center Distribution Group you want this app to be deployed to. The default Distribution Group is the Collaborators group. Currently the only way to find the group Ids is by going to the Mobile Center API Service Page choosing Accounts, and looking for the /v0.1/apps/{owner_name}/{app_name}/distribution_groups GET call. make sure you see a blue (i) to the right of the Response class. If you do not see that, make sure you are loged in AND have entered your API token ( the one you generated in step 1 ) into the API to authenticate your self and allow the calls on the site to work. Fill the owner_name and app_name parameter fields (required). these are the same that were used for the App Slug Step. Once the info is entered, click the “Try it out” button and your Collaboration Group Id’s will be in the response body. Copy the Id and paste it into the Distribution Group Id field. Note: The Default Group Id of Collaborators will always be 00000000-0000-0000-0000-000000000000 no matter what app you are deploying to in Mobile Center.
There is also the Symbols Type drop down list in the Symbols section, make sure to change this to the proper type of the app you are building out to. Since the app is already compiled into a .apk or .ipa, you don’t need to fill out the rest of this section.
From here, verify that the Zamboni Build task is after the Publish Artifact: drop build task and all your environment variables are configured properly. You are now set to Queue the build task. If the Task is sucessfull the app will now appear in Mobile Center. The members of the Distribution Group you deployed to earlier will receive an email notifying them the new app is ready to download.

While this does not give you the full Mobile Center experence and requires your to have your own or use the hosted build host, this will at least allow you to get started using the distribution, analytics, and crash reporting features of Mobile Center.
Using VSTS Git Repositories with Mobile Center: Configuring your Get client to allow for Multi Origin Fetches and Pushes
There is a second work around that will give you the ability to also use Mobile Center’s build process as well while still using your Visual Studio Team Services Repository. This will require you to go and set up a GitHub Account and a public or private repository for your app. While I realize at this point you may as well just commit your code to GitHub only, but this solution is for those who want to try Mobile Center while you wait for the VSTS integration to go live. This is also not the only way you can achieve this effect, I chose this way because it will allow you to start from the same code base as your current repository and try both Work around 1 and this workaround without altering your existing environment to heavily though you cannot use another analytics and crash reporting platform along aside Mobile Center as they tend to interfere with each other. This includes if you are using HockeyApp as well.
[Instructions coming soon]
Please Note: While I will try to respond to comments in this post as quickly as I can, the fastest way to get support is to use the messager built into Mobile Center or to post your questions on the mobilecenter channel of the Hockey Camp slack team (hockeycamp.slack.com).

Awesome overview and getting started guide Mitch!
LikeLike
Really helpful article Mitch
LikeLike
Is there a new name for Zamboni Upload? I can’t find it in the build tasks list.
LikeLike
Simon, just so you know this process has changed from Zamboni to the Mobile Center upload. I am still working on updating the article
LikeLike
Hi Mitch, Are you planning to cover also UWP deploy to Mobile Center via VSTS? I’m trying to do it, but till now no luck. thanks
LikeLike
yes, sorry for the delay. UWP has been changing so much with mobile center that its just now starting to settle down. if you are still having issues I can try to help while i write up the post.
LikeLike
no worries and thanks for your reply and also for the chat, as I already told you meanwhile I worked it around building it in vs app center, but I’ll wait for new article with a clean and proper way to integrate with VSTS. thanks
LikeLike
Hi, thanks for this. Would it be possible to cite some of the evidence based research you quoted as this would be really helpful and powerful 3 week diet.
LikeLike